实验三 - RHEL5版
考虑到99%的用户不会使用我的Ubuntu,特此使用rhel5进行重做。(累死了) 我好难(瘫)
本教程基于Hadoop的RHEL5进行,在进行这些步骤之前,记得先备份好你已经配置的Hadoop。
由于RHEL5是一个非常古老的版本,其线上更新需要收费,而我们编译却恰恰需要安装各种各种东西,不得已我们只好对yum进行修改。
但是更蛋疼的来了,这个系统的yum对应centos5.5,这个系统17年已经停止支持,镜像已经基本全部完蛋了。所以下面的操作都是我自己研究的.jpg
首先使用SSH链接上RHEL5,准备开始操作。
创建新的联网网卡
Hadoop的RHEL5默认网都没有……
首先在Vmware处新建一个网卡:
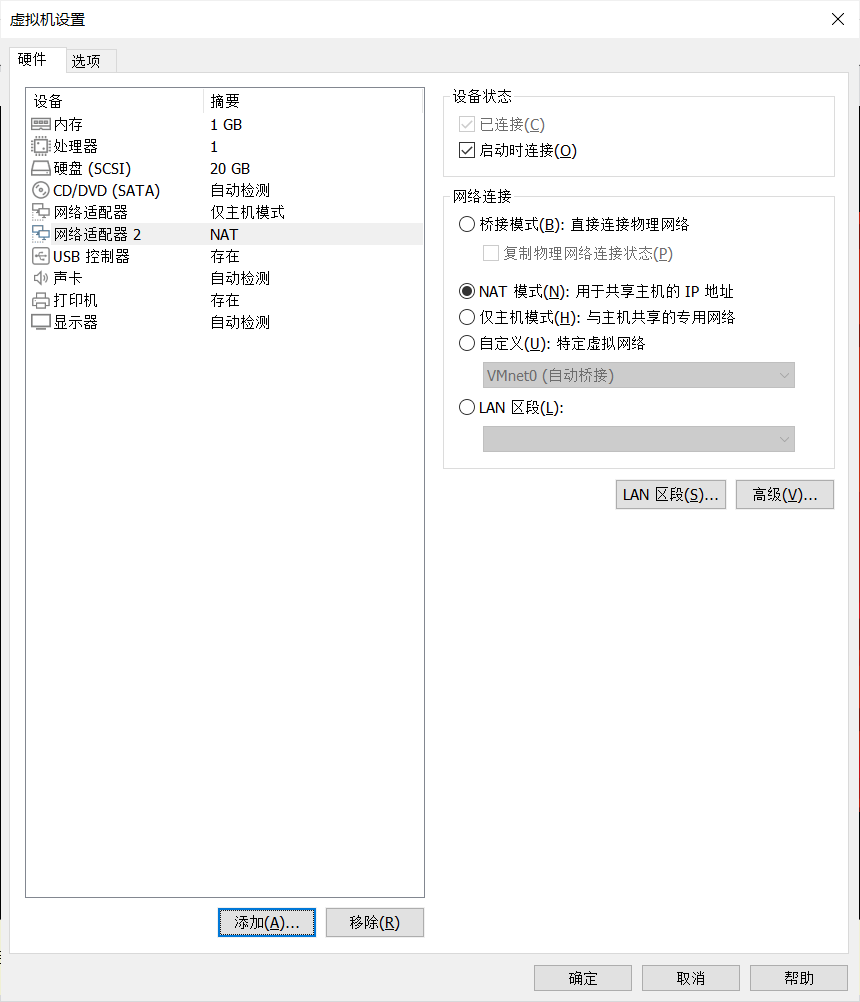
设置如图所示之后,重启虚拟机,并查看network:
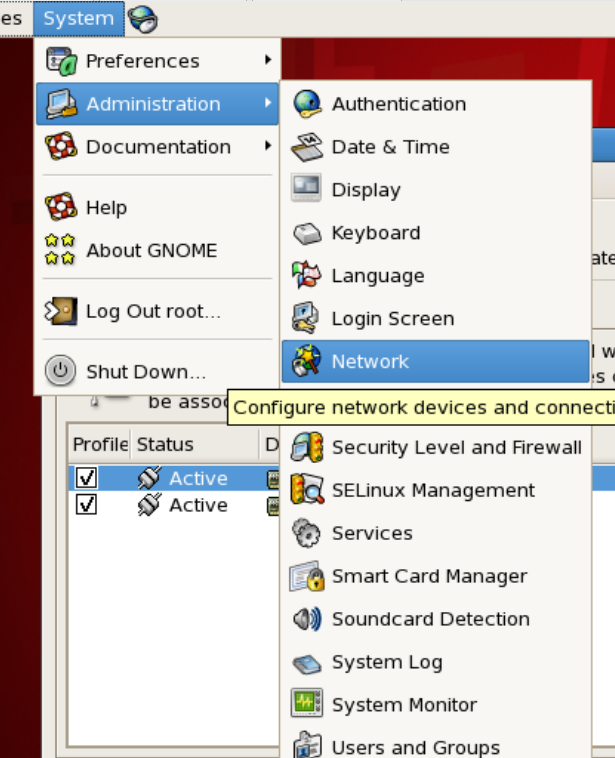
看到有两个网卡,eth0和eth1都是active,此时你的RHEL5可以正常上网了。
更新YUM
由于RHEL5已经是过去时了,它的yum早已经被废弃。我们只能靠CentOS5的yum源。但是很不幸,CentOS5的源也早就被废弃了。
所以我们只好靠镜像……
首先查看系统对应版本:
uname -r

查看内核为2.6.18,其对应的CentOS5.5。
进入阿里云旧版本镜像,打开链接:
Index of /centos-vault/5.5/os/x86_64/CentOS/ (aliyun.com)
之后用CTRL+F搜索所有的yum:
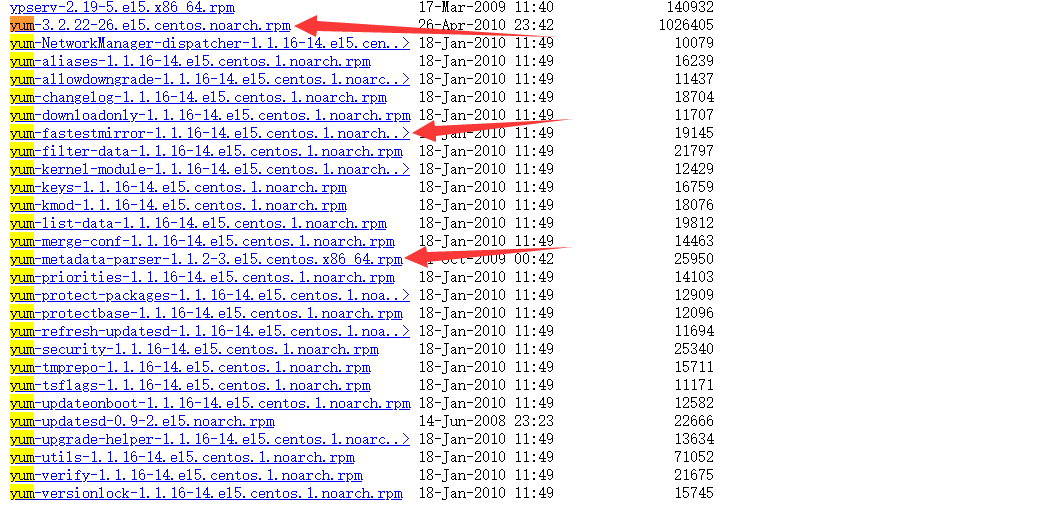
下载这三个,备用。
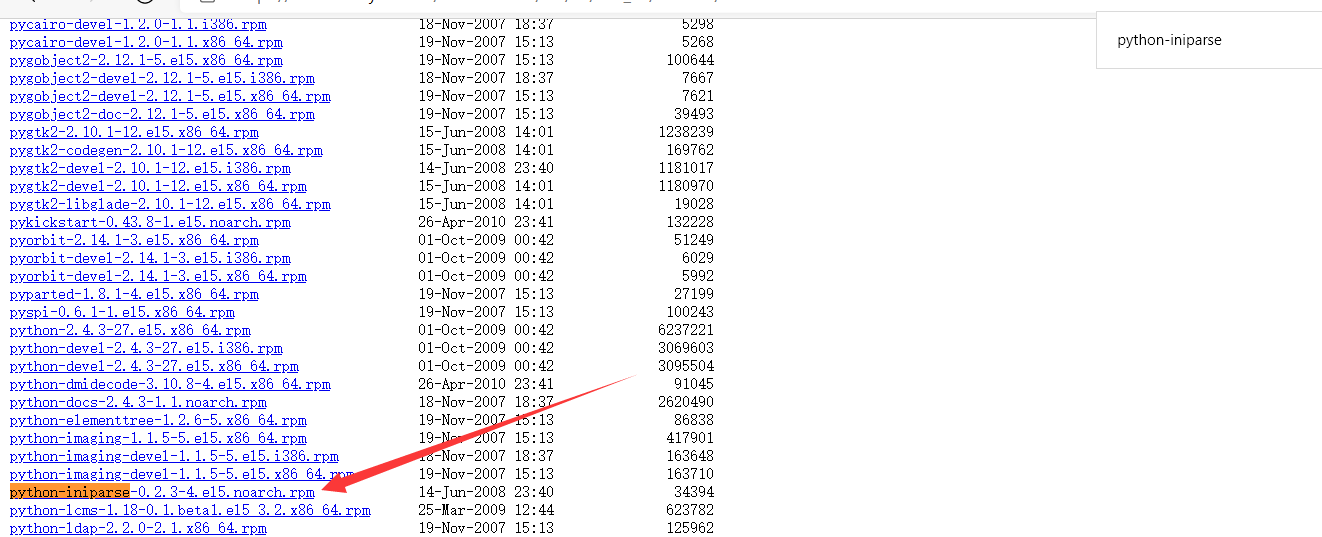
再下载这个备用。(搜索关键词:python-iniparse)
下载完成后,SSH内输入:
rpm -aq|grep yum|xargs rpm -e --nodeps
删除原本的yum。
完成后将刚才的文件用SSH发送上去

之后切换到发送目录,输入
rpm -ivh --force *.rpm
安装yum。
此时yum可用但需要换源。因为网上的源全废了,所以只好自己配置源:
首先从163的服务器上下载一个他们的模板,准备用这个模板来进行更改:
# CentOS-Base.repo
#
# The mirror system uses the connecting IP address of the client and the
# update status of each mirror to pick mirrors that are updated to and
# geographically close to the client.  You should use this for CentOS updates
# unless you are manually picking other mirrors.
#
# If the mirrorlist= does not work for you, as a fall back you can try the
# remarked out baseurl= line instead.
#
#

[base]
name=CentOS-$releasever - Base - 163.com
baseurl=http://mirrors.163.com/centos/$releasever/os/$basearch/
gpgcheck=1
gpgkey=http://mirror.centos.org/centos/RPM-GPG-KEY-CentOS-5

#released updates
[updates]
name=CentOS-$releasever - Updates - 163.com
baseurl=http://mirrors.163.com/centos/$releasever/updates/$basearch/
gpgcheck=1
gpgkey=http://mirror.centos.org/centos/RPM-GPG-KEY-CentOS-5

#packages used/produced in the build but not released
[addons]
name=CentOS-$releasever - Addons - 163.com
baseurl=http://mirrors.163.com/centos/$releasever/addons/$basearch/
gpgcheck=1
gpgkey=http://mirror.centos.org/centos/RPM-GPG-KEY-CentOS-5

#additional packages that may be useful
[extras]
name=CentOS-$releasever - Extras - 163.com
baseurl=http://mirrors.163.com/centos/$releasever/extras/$basearch/
gpgcheck=1
gpgkey=http://mirror.centos.org/centos/RPM-GPG-KEY-CentOS-5

#additional packages that extend functionality of existing packages
[centosplus]
name=CentOS-$releasever - Plus - 163.com
baseurl=http://mirrors.163.com/centos/$releasever/centosplus/$basearch/
gpgcheck=1
enabled=0
gpgkey=http://mirror.centos.org/centos/RPM-GPG-KEY-CentOS-5

#contrib - packages by Centos Users
[contrib]
name=CentOS-$releasever - Contrib - 163.com
baseurl=http://mirrors.163.com/centos/$releasever/contrib/$basearch/
gpgcheck=1
enabled=0
gpgkey=http://mirror.centos.org/centos/RPM-GPG-KEY-CentOS-5
将上面的代码先复制到记事本,然后进行修改:
首先看baseurl,每一个baseurl要从镜像站找到对应:
Index of /centos-vault/5.5/ (aliyun.com)
然后改成对应的状态。注意这个系统更新的时候不能从HTTPS更新,所以我们要去掉https的头变成http,这便对镜像站有了更高的要求。
一番修改之后如下:(可以直接复制走抄了,感谢我吧.jpg)
# CentOS-Base.repo
#
# The mirror system uses the connecting IP address of the client and the
# update status of each mirror to pick mirrors that are updated to and
# geographically close to the client.  You should use this for CentOS updates
# unless you are manually picking other mirrors.
#
# If the mirrorlist= does not work for you, as a fall back you can try the
# remarked out baseurl= line instead.
#
#

[base]
name=CentOS-$releasever - Base - 163.com
baseurl=http://mirrors.aliyun.com/centos-vault/5.5/os/x86_64/
gpgcheck=1
gpgkey=http://mirrors.aliyun.com/centos-vault/5.5/os/x86_64/RPM-GPG-KEY-CentOS-5

#released updates
[updates]
name=CentOS-$releasever - Updates - 163.com
baseurl=http://mirrors.aliyun.com/centos-vault/5.5/updates/x86_64/
gpgcheck=1
gpgkey=http://mirrors.aliyun.com/centos-vault/5.5/os/x86_64/RPM-GPG-KEY-CentOS-5

#packages used/produced in the build but not released
[addons]
name=CentOS-$releasever - Addons - 163.com
baseurl=http://mirrors.aliyun.com/centos-vault/5.5/addons/x86_64/
gpgcheck=1
gpgkey=http://mirrors.aliyun.com/centos-vault/5.5/os/x86_64/RPM-GPG-KEY-CentOS-5

#additional packages that may be useful
[extras]
name=CentOS-$releasever - Extras - 163.com
baseurl=http://mirrors.aliyun.com/centos-vault/5.5/extras/x86_64/
gpgcheck=1
gpgkey=http://mirrors.aliyun.com/centos-vault/5.5/os/x86_64/RPM-GPG-KEY-CentOS-5

#additional packages that extend functionality of existing packages
[centosplus]
name=CentOS-$releasever - Plus - 163.com
baseurl=http://mirrors.aliyun.com/centos-vault/5.5/centosplus/x86_64/
gpgcheck=1
enabled=0
gpgkey=http://mirrors.aliyun.com/centos-vault/5.5/os/x86_64/RPM-GPG-KEY-CentOS-5

#contrib - packages by Centos Users
[contrib]
name=CentOS-$releasever - Contrib - 163.com
baseurl=http://mirrors.aliyun.com/centos-vault/5.5/contrib/x86_64/
gpgcheck=1
enabled=0
gpgkey=http://mirrors.aliyun.com/centos-vault/5.5/os/x86_64/RPM-GPG-KEY-CentOS-5
之后我们将文件名改为
CentOS5-Base-163.repo
然后拷贝到
/etc/yum.repos.d
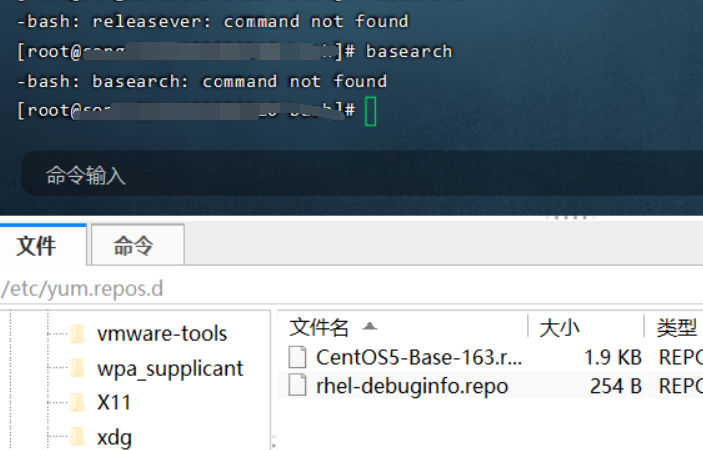
拷贝后运行:
yum clean all
yum makecache

到此成功。
下载源码
Index of /pub/linux/kernel/v2.6/
到这里找2.6.19版本下载(linux-2.6.19.tar.gz )
下载之后丢进虚拟机。
之后切进目录,使用
tar -zxvf linux-2.6.19.tar.gz
解压内核源码。
之后进入解压的文件夹。
配置内核安装
首先需要安装一个前置插件
yum install ncurses-devel ncurses -y
安装后将虚拟机屏幕最大化,里面的终端也最大化后 执行内核配置命令:
make menuconfig
运行之后直接选Exit退出。
然后开始修改源码:
源码的修改
2版本和我之前做的5版本许多地方都不一样,不过它的编译速度很快。
参考了这些大佬的博客:
但是这位大佬的博客和实际仍然有一定差距。
经典 【操作系统实验】实验四 添加系统调用RedHat5 kernel2.6.18_aossda的博客-CSDN博客
(64位Linux系统调用的添加以及系统调用的原理_xiaofanzidafanzi的博客-CSDN博客_64位系统调用
运行如下命令:
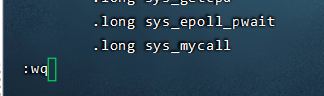
vi kernel/sys.c
Shift + G跳到最后,添加一个自己的函数:
asmlinkage int sys_mycall(int number)
{
		printk("<0>""<0>Hello Super Blade !!\n");
		printk(KERN_EMERG"KERN_EMERG  Hello world!\n");
   		return number;
}
再然后修改:(添加指针)(不太清楚这个是否在64位上有影响,个人猜测是没有的)
vi arch/i386/kernel/syscall_table.S
末尾添加:
注意,接下来的操作将会有所不同,由于Linux32位和64位有所不同会导致修改点不同
首先敲uname -a

如果看到X86_64,请跳过分割线的部分,如果是i386则继续看下方内容、
我是分割线 <hr>
i386:
添加系统调用号:
vi include/asm-i386/unistd.h

确定这个最后一位(上面是319),然后加一行自己的#define __NR_mycall 320
(记下这个系统调用号,比如这里是320)
分割线结束<hr>
如果是X86_64的版本,则使用如下命令:
vim include/asm-x86_64/unistd.h
修改此处如图:(添加了522-523行)
注意,这个280是原本279 + 1,也就是放到了最后一位,如果你使用的内核和我不同,请理解后修改下面的代码。
#define __NR_mycall             280
__SYSCALL(__NR_mycall, sys_mycall)

注意:#define后面,原本是
#define __NR_syscall_max __NR_move_pages
现在改成了
#define __NR_syscall_max __NR_mycall
其原理仍然是添加系统调用号。
在添加完之后请记住这个调用号,比如这里是280.
上方i386和x86_64有所不同,请注意好好确定。
全部完成之后,开始编译工作。
源码的编译
之后开始编译内核,在此之前请先把虚拟机分配的调大一些,方便快速出内核。
分配内核的调整请参考Ubuntu部分的操作,在此不再赘述。
什么,你不知道我说的哪个?自行翻阅 Ubuntu实验三 火力全开部分(右上角Content可以查看目录)
调整好之后,首先进入linux目录下,然后再开始编译:
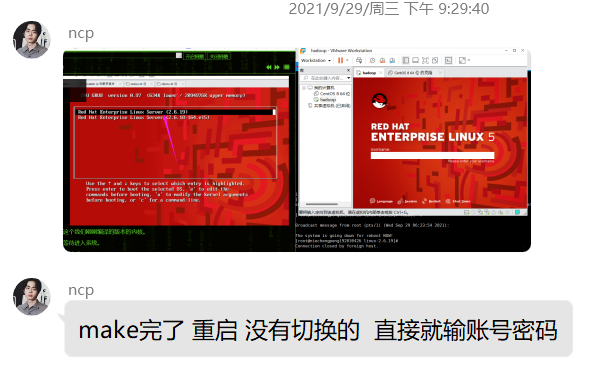
(感谢 @ncp 的反馈,确实需要提及一下编译位置)
首先输入:
make mrproper
清理可能有过的编译。
之后输入:
make
进行内核编译。
等走完进入后输入:
make modules
make modules_install
make install
全部完成后,输入:
reboot -n
重启系统,然后切换到虚拟机里,按键盘的上/下键:
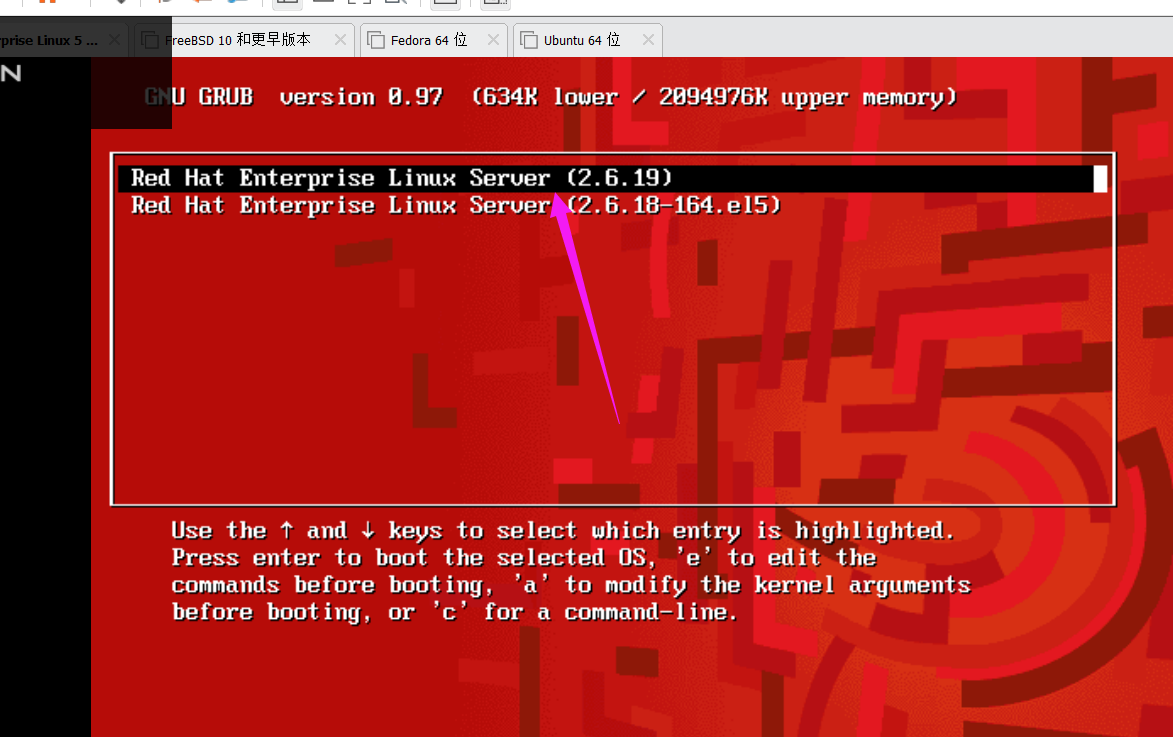
选择这个我们刚刚编译的版本的内核。
注:(根据某些朋友的反馈,没有切换的直接输入账号密码也可,该情况目前存疑,可以自行尝试进入系统后敲uname -r查看是否成功)
之后等待进入系统。
进入系统后,使用:
vi test.c
然后输入如下:
#include<stdio.h>
int errno;
int main(int argc, char *argv[])
{
 long x;
 x = syscall(自己改);      //这里的自己改改成上面让你记住的系统调用号。什么?忘了?自己翻去!
 printf("yes, success! it's %ldn", x);
 return 0;
}
之后
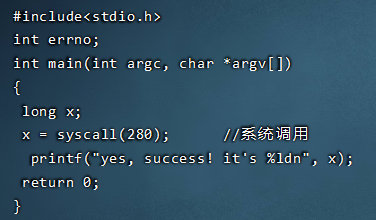
之后使用
gcc -o test2 test.c
编译生成后运行
./test2
显示:
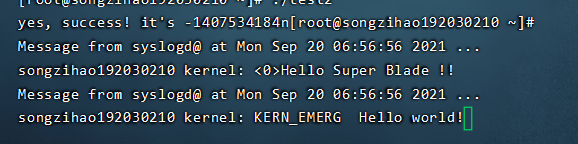
说明成功!